 I am always looking for fun, inexpensive gift ideas. This is an easy tutorial from Inspiring Ideas. The picture is hers. Hop on over and check it out!
Showing posts with label tutorials. Show all posts
Showing posts with label tutorials. Show all posts
Friday, May 11, 2012
~*~ Glossy Bookmark/magnet ~*~
I am always looking for fun, inexpensive gift ideas. This is an easy tutorial from Inspiring Ideas. The picture is hers. Hop on over and check it out!
Thursday, May 5, 2011
Denim Do-it-All Bins @Craftzine.com blog

Another great denim project. Please note the picture is not mine it is from Craft zone. Please click the link above and check it out. I will be making some of these for sure! ;)

Bib Apron from jeans !

Monday, November 22, 2010
~*~ Crochet Mug Cozy Tutorial ~*~
 Love this crochet cozy mug tutorial. The picture and tutorial are from Mimi's Crochet Stuff. Click HERE to check it out.
 ~*~ Little Girl's Apron Tutorial ~*~
 Cute, cute, adorable Little Girls Apron from My Blonde Ambitions blogspot!
Click on over there and check this out! Darling for the "little" homemaker for Christmas! The picture is NOT mine, it is from My Blonde Ambitions!
Monday, November 15, 2010
~*~ Crayon Roll Tutorial ~*~

Check out the tutorial at All Things Heart and Home. The picture is hers not mine. I have to make up some of these for the grands. This is so cute!
~*~ Pillowcase Tutorial

I love these pillowcases shared at Visions of Sugarplums. I am making pillowcases for all of my grands for Christmas so had to share this pattern. Hopefully next week I will have some pictures to share of some of them that I have made.... if I get my rear in gear! Hope on over to Visions of Sugar plums and check out her tutorial! Picture is not mine it is Visions of Sugar plums.
Sunday, November 14, 2010
~*~ Rag Bracelet Tutorial ~*~

I think this is something my granddaugthers would REALLY love! How cute is this? And is also shares their faith! The tutorial is at Hodgepodge Life. Also, the picture is hers and not mine. Please go and check it out! Fun craft!
Saturday, November 13, 2010
Candy Cane Wreath from Better Homes and Gardens

Candy Cane Wreath
Use an iconic Christmas favorite in a new way -- decorate a wreath with pretty red- and-white candy canes.
Candy Can Wreath
Enlarge Image
What You'll Need
* Plastic foam wreath form
* White satin ribbon
* Hot-glue gun and glue sticks
* Mini candy canes
* Small red ornaments
* Red and red-and-white striped ribbon
* Stapler
How to Make It
1. Wrap the wreath form with white satin ribbon.
2. Layer candy canes randomly, hot-gluing them into place.
3. Hot-glue ornaments on top of the candy canes.
4. Fashion a bow from three lengths of red ribbon shaped into progressively smaller loops; hot-glue the overlapping ends of each loop together. Wrap a length of the red-and-white striped ribbon around each loop; hot-glue the overlapping ends of the red-and-white striped ribbon loops together.
5. Stack the ribbon loops, and staple them together in the center. Wrap another piece of red ribbon around all three; hot-glue the overlapping ends together. Repeat with a length of red-and-white striped ribbon.
6. Cut two more lengths of the red ribbon and two more of the red-and-white striped ribbon. Lay a striped ribbon over each red ribbon and hot-glue to the back of the looped ribbons.
7. Adhere the entire bow to the bottom of the wreath with hot glue.
Picture and directions are from BETTER Homes and Gardens.
http://www.bhg.com/holidays/christmas/wreaths/candy-cane-wreath/
Sugar Bee - Craft Edition: crafts, sewing, recipes, photo tips, and more!: Glass Tile Pendants
 Simple easy gift idea! Picture is by Sugar Bee, it is NOT mine. Click on over to find the instructions on how to make these. Great craft to do with your child or grandchild. :)
Sugar Bee - Craft Edition: crafts, sewing, recipes, photo tips, and more!: Glass Tile Pendants:
Wednesday, November 10, 2010
~*~ Pretty Yarn Angels with instructions ~*~

These are ADORABLE! And how easy and quick these would make up... Great package adornment, ornaments or just a sweet "nothing" tucked into a card with a word of encouragement and/or love! The picture is not mine it is from the Crafty This and That. Please check out this blog and the directions. Crafty This and That.
Country Angel Pin
from Crafty This and That: (her words not mine... decided to copy over here so directions are not lost!)
I call these country angels. They are quick and easy to make.
It only takes a 3 1/2 inch circle of cotton cloth, strands of cotton yarn, a short piece of ribbon, wire for the halo, a pin for the back and a good glue such as E-6000.
First I formed my wire into a small circle about an inch in diameter. I folded the 3 1/2 inch circle of cloth in half to form the wings. I then added a little dot of glue in the middle of the half circle to hold the 2 sides together. For the head and body, I cut as many strands of cotton yarn that is needed to make it look nice. It really depends on what thickess of yarn I am using and how full I want it to look. I cut about 18 strands to about 6 inches long for this one. After they were cut and gathered together nicely so the ends are about even, I carefully thread one end of the strands of yarn through a wire circle, and fold the yarn over the part of the wire where the wire is fastened together, checking to make sure it is folded in the middle and both ends of the yarn are brought together so that all the ends are about the same length. If some are a little off, they can be trimmed or left as they are. Next, I carefully tied the ribbon around the neck to form the head and body. The body was glued to the cloth circle that was folded in half and a pin glued to the back. Let the glue dry thoroughly.
Easy!
Tuesday, November 9, 2010
The Boy Trifecta: One Yard Wonders All Ages Classic Jumper - Patter...
 How cute is this!!! Pic is by The Boy Trifecta! Please click the link below to check out this one yard wonder! I bet I know a granddaughter or two that would enjoy this! Darling!
The Boy Trifecta: One Yard Wonders All Ages Classic Jumper - Patter...: "As part of my handmade holiday gift for my friend's daughter Mya, I made the All Ages Classic Jumper by Amanda Sasikirana from the One-Yard ..."
Monday, November 8, 2010
The Boy Trifecta: Double Potholder Tutorial

The Boy Trifecta: Double Potholder Tutorial: "I've finished my first handmade holiday gift! I finished it earlier in the week, but I spent my whole week painting and never got around to ..."
Wednesday, October 20, 2010
Fabric Covered Notebook tutorial

I love journals and especially homemade journals. Check out this great tutorial from Adventures in Dressmaking. Please note, the picture is NOT mine, it is from Adventures in Dressmaking. Great blog!!
Monday, October 18, 2010
Silly Bands Necklace Tutorial

Silly bands are all the rage these days with kids of all ages. Here is a fun tutorial to sit down and craft with your kids or grandkids. Please note the picture is not mine but that of Cut Out and Keep. click here for tutorial
Friday, October 15, 2010
Coffee Filter Wreath
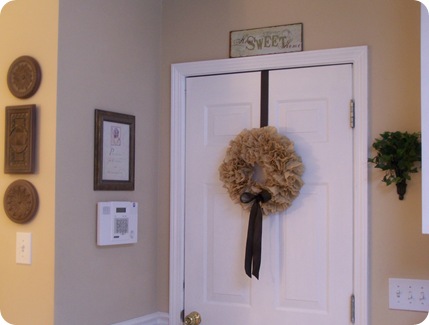
This is another great inexpensive and gorgeous craft! Thank you to Centsible Savings. This is her picture and here is her blog to find the tutorial: Centsible Savings; Coffee Filter Wreath
Halloween Cupcake Topiary Tutorial
 This is absolutely adorable! Not just Halloween, but could adapt for any holiday! The picture is NOT mine, it is from craftomaniac.blogspot.com Please check out her blog for this darling and easy craft!!!
Monday, September 20, 2010
Scrapbook Paper Gift Bag Tutorial

I am all about using up my "stash" and trying to keep things economical. I like these scrapbook gift bags from "from An Igloo". The picture and tutorial are hers. I am just sharing with you. Please go and check out her fun blog! :)
Scrapbook Paper gift bags tutorial

Duct Tape purse Tutorial

This looks like a fun project to do with pre teen girls!
Check it out at All Things Thrifty! Wonderful tutorial!
Tuesday, August 24, 2010
Dollar Store Art apron from dish towel from Obsessively Stitching

Hope you will check out this adorable tutorial at Obsessively Stitching. How cute is that! I think I will make a few for my younger grandchildren. The picture is from Obsessively Stitching, it is NOT mine.
Subscribe to:
Posts (Atom)